3000pt Quasi Practice Game
Over the winter holidays I was finally able to fit in my first game with the latest Warhammer 40,000 rules. Rob my new regular (if once every few months is regular) opponent suggested a 3000 point game I was a little hesitant but agreed. I hadn't played a game that large in a long time and with recently pruning my army down to the best looking third I was a bit worried I had enough stuff.
I ended up having enough stuff, but I had to field most everything in less than optimal fashion, leaving me with a somewhat odd army list. My opponents would consist of two 1500 point armies. I also got to use two force allotments.
The Forces of Nurgle
Army A: I started with choosing all my HS for both armies, cause with Nurgle no longer being able to have man mounted heavy weapons I had painted a lot of vehicles over the last few years. I chose both armies simultaneously basically fielding everything I had painted well, starting with HS, than HQ, than Troops. This army ended up with all my walkers. For my HQ, I wanted more expensive lords than usual, so I took Leperous tooled up with the Man Reaper among other stuff. Four troops this list got seven plaguebearers, and three plague marine squads. The first plague marine squad was 14 models strong and had infiltrate. The other two squads were seven models strong and were given rhinos.
Army B: This army got the landraider and the recently touched up predator. The predator was given both Mutated Hull and Parasitic Possession. Though I'd like different weapon mounts for fourth edition. My third GT army was suppose to have a tweaked out predator with those two vehicle upgrades, so this was an opportunity to test them out. Both these tanks had smoke launchers but I never used them... The HQ choice for this list was Slim, as Rob seems to have an irrational fear of deamon princes. He was given the following rewards: Daemonic Stature, Mark of Nurgle, Daemonic Flight, Nurgle's Rot, Daemonic Aura, and Daemonic Fire. He also had two CCWs and a Personal Icon. This army list got the "big unit" as Rob has dubbed them and a whole bunch of daemons, two squads of seven plaguebearers and seven stands of Nurglings. Lastly this army list got my terminators as an Elite choice. I have to admit I cheated too, I just pulled out the models and priced them out based on the wargear they were armed with and I forgot to buy them Marks of Nurgle. It was an honest oversight, especially for someone in a hurry who hadn't played a game of 40K in over four months. All this added up to just under 3000 points.
Imperial Forces
Rob's Imperial Guard Army was the same as he had used before. Although he had painted up a third unit of Rough Riders (with his final goal for his army being an all Cavalry and Infantry - no vehicles). He hadn't had a chance cut a bunch of new foam for his carrying cases to accommodate them so he decided to go with the exact same force as before.
Jonathan's Space Marine force was a slice of his regular 3000pt. force. His favourite model is his tricked-out chaplain with Jump pack that he attaches to his Assault Squad - all rigged up for assault. The rest of his force contained: a Force Commander with Stormbolter, Power Weapon and Iron Halo, three Tac squads (two with PlasmaCannon/gun combos, one with Plasma gun/Lascannon combo), a Predator and a Vindicator.
Deployment
I can't remember the exact name of the mission we played, but you got extra points for capturing objectives. Unfortunately you couldn't drag the objectives with you, so being me I ultimately advanced past the objectives and then had to come back in the later turns to get the extra points. The objectives were roughly in the middle third and distributed fairly evenly from left to right.
As is wont to happen I didn't do the best job placing my units. I had so many heavy support choices I just stuck them where they would fit and I left a big spot for the big unit in the center. I would have liked to have more plague marines but I was sticking with the best looking models. Perhaps my greatest blunder was putting Leperous with the big unit. I think I did this because in my real next army list, my real next general will deploy with them. I should have stuck him with one of the rhino squads. As it was he spent most of the game walking forward. I was able to infiltrate my large squad behind some trees but that didn't work out so well either. Seven man squads are better for infiltration. Having so many daemons and infiltrators meant only one squad of plague marines was deployed on foot. This made my side look pretty sparsely populated at the end of deployment.
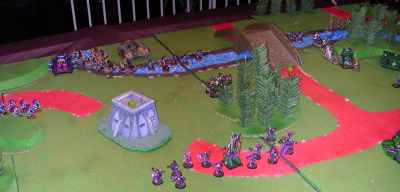
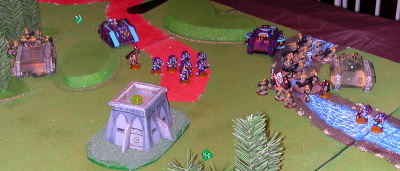
Rob and Jonathan had less heavy support than me, which was a bit odd. Rob also had an entire platoon with infiltration. Below is a photo of how the troops were deployed by both sides.
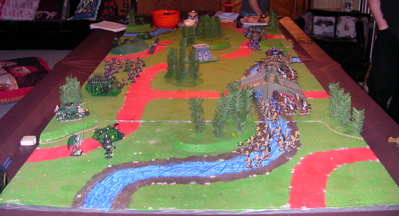
As you can see most of the guard were on my right flank with most of the marines in the center or left flank. I once again gave away the side with the river. You'd think deploying and staying put in a river would be a poor tactical decision, but in 40K you get a cover save, the opponent has to roll for difficult terrain to charge you and you get to strike first when they do make it. This made the river a defacto trench running the length of their line. This was to prove decisive in the center of the board, next time we set up the terrain the river is running across the board not along one side.
Rob and Jonathan's Deployment Thoughts
Jonathan and I went with a really straight forward deployment. The Imperial HQ (with attached heavy Weapon Squads), the Predator, one Tac squad, one Rough Rider squad and the Leman Russ all set up in the centre of the board. The first model we put on the board was the Leman Russ and in retrospect placing it in a position of prominence on the bridge may not have been the best place for it but it just seemed natural to have it crawling across the bridge as the game opened. The Chaplain with his Assault Squad bodyguard, the Armoured Fist and Vindicator on our right flank. On our left flank we placed a Tac squad, the second Rough Rider squad and the whole platoon of Light Infantry. The plan was to use the flanking units to claim objectives while the big guns in the centre of the table looked to take out Muskie's expensive stuff.
Loyalist Turn One: Open Fire and Charge!
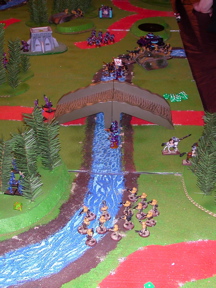
After winning the choice of sides I lost the roll to go first, which I thought given the number of heavy weapons arrayed across the board would hurt. Jonathan has a definite preference for plasma weaponry and over the course of the game many marines would be killed by their own weapons including a single marine this turn. Despite my fears I fared alright with all my vehicles but a rhino surviving. Where things went bad was allowing the assault marines to leap into H2H on the first turn by deploying my infiltrators too near them. A tooled up chaplain who cost more than either of my lords was with them. My plague marines and Bob the Necessary Evil fought them for many turns before eventually secumbing. The picture below shows how things stood after one round of shooting and H2H. All you can see is Bob's power fist surrounded by all the assault marines and the Chaplain. Their icon bearer died and the destroyed rhino on that side prevented Plaguebearers from getting to their aid in a timely manner.
Chaos Turn One: Return Fire and Advance
I returned fire, the Defiler's battle cannon did nothing, but the predator and the landraider won their dual with the Leman Russ. Ultimately the Leman Russ would be obliterated as would most anything else that could be seen by both my tanks, but the Landraider was immobilized early and I chose never to move the Predator in order to maximize it's shooting. My twin heavy weapon dread also beat up on the vindicator though an importune dose of blood frenzy would allow it to escape behind the trees again in a future turn. The other dread lost it's autocannons early and was forced to fight on with it's combi-bolter much to the amusement of Rob.
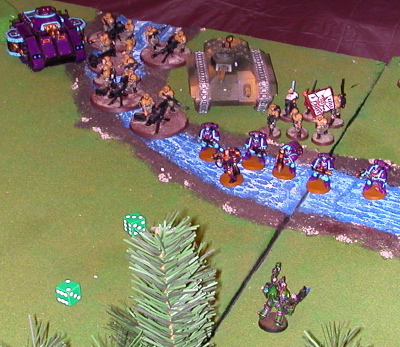
I advanced the working rhino and got out. This squad got off one round of shooting before the Roughrider charge hit. The picture below shows my advance as well as the busted rhino and the pinned/shaken squad. The Nurglings got into H2H but I lost the combat overall and some of them died due to instability. This would ultimately do them in due to their low leadership value.
Loyalist Turn Two: Cavalry Charge
The Roughriders rode into the big unit and into The AXE Gang faring much better than in previous games. The AXE Gang were wiped out, while Syphilis and Leperous wiped out the other unit of Roughriders lead by the seargent with the Honorificus. Manreaper didn't do much despite getting Leperous five extra attacks. Everything was dead before the Nurglings which infested Leperous got to attack. The big unit was looking pretty tough but their lack of speed and sheer amount of firepower deployed across from them would ultimately do them in.
Chaos Turn Two: Reinforcements
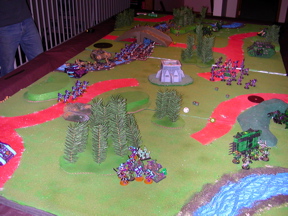
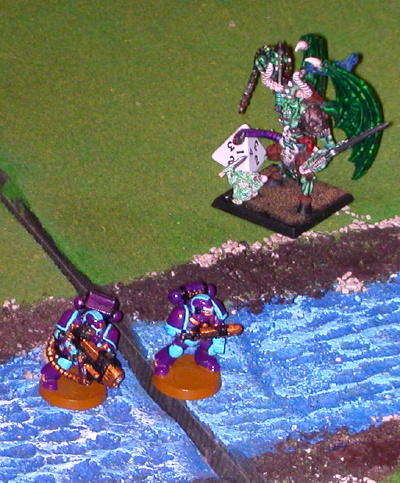
This turn allowed me to summon one squad of daemons, the blue plaguebearers and teleport in the terminators. This was my first game with the new edition and I over estimated how effective the terminators shooting would be, plus I wanted them to be far from the vindicator so I put them smack dab infront of the Predator Anhilator, Heavy Weapons Team, and Spacemarine and Imperial Guard Command Section. I don't like the fact when you deep strike in you can't move and have to deploy all huddled together. I thought by being able to shoot the terminators could kill something. Despite two reapers, some bolter rounds and a mealta shot very few marines died. In future games I will likely deploy them normally or teleport them into cover or better still out of sight. If you look closely you can see them clumped together in front of Syphilis. They were basically sacrificed to give Leperous and company an opportunity to advance.
In H2H the blue plaguebearers charged and routed the roughriders, while Bob and the Chaplain continued to duke it out. The assault squad would ultimately triumph over all that it faced but it took them twelve rounds of H2H to finish everything off. I think this was the turn I rolled 12 for the Nurglings instability test and killed two whole stands. My twin heavy weapon dreadnought went Blood Rage once, while the dread left with just a combi-bolter got Fire Frenzy the turn after.
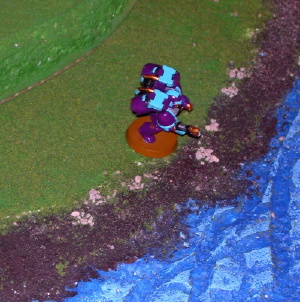
Loyalist Turn Three: Kill the Terminators
Everything that could, opened fire on the terminators. This is when I realized I forgot to buy them Marks of Nurgle, so we played them with toughness 4. Despite many plasma weapons, autocannons, lascanons, bolters, lasguns and who knows what else, one terminator survived this round of shooting. At some point Boris was destroyed and Bob and the Nurglings were finally killed by the Chaplain and the assault marines. The picture below shows the lone surviving terminator.
Chaos Turn Three: Advance and Wheel on the Right Flank
Although I was doing poorly on the left flank, I dominated the right flank. The blue plaguebearers, over the course of the game, would ultimately kill a unit of roughriders and an entire infantry platoon pretty much by themselves without losing a model. Slim and the Beast Rabaan would chip in a bit, though Slim would ultimately head for the center to try reach the loyalist lines there.
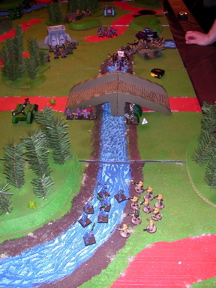
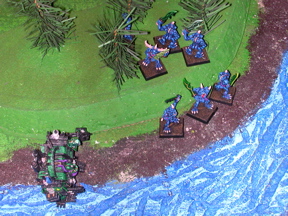
In this turn the other two units of plaguebearers would arrive. Another unit would be summoned around Slim whilst the final one was summoned around Gangrene in the hopes of stopping the Chaplain and the assault squad. In the picture below you can see the horses about to run off the board again, whilst the blue plaguebearers advance through the trees towards their next victims. The new purple plaguebearers and Slim are on the otherside of the trees nearer the bridge.
Loyalist Turn Four: Continue Firing Until None Remain!
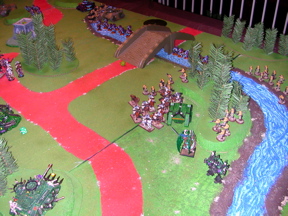
The terminators are no more and the fire power of the Loyalist center and their right flank was trained upon Leperous and Syphilis. The photo below was taken in turn four but not necessarily at the end of the Loyalist turn, likely at the end of the Chaos turn.
The assault squad and the Chaplain continued to largely have their way on my left. Though ultimately only one assault marine would survive. The Chaplain would eventually bound off towards the center leaving the objective on that flank to be capture by the Armoured Fist squad.
Chaos Turn Four: Secure the Right Flank
The blue plaguebearers and the Beast Rabaan are left to eliminate the last loyalists on the right flank, while Slim, some plaguebearers and the Rhino attempt to aid Syphilis and Leperous in the center.
Loyalist Turn Five: Kill Them All!
The combined fire of pretty much every marine and guardsman on the left and in the center is trained upon Syphilis and Leperous cutting them down in the open ground before they could reach the Imperial line.
Chaos Turn Five: Slim Falls Agonisingly Short
The game was not going well. My tanks though alive were having trouble seeing loyalists and killing them. Syphilis and Leperous were dead. The Chaplain was having his way on the left, my twin heavy weapon dread was embroiled in H2H with the last two assault marines, with everything else on that flank being dead. The dread lost arms and was immobilized but fought on with its one attack. Slim flew towards the tactical squad, having killed the ones on the other side of the bridge. I stopped breathing fire in hopes I could reach them on the charge. With three dice the highest roll I could get was a two for my difficult terrain test to charge. I needed at least a three or a four. This was a bit cruel considering the Deamon Lord was attempting to take on the entire loyalist center alone. On the right I secured my position and the two objectives there.
Loyalist Turn Six: Destroy the Monstrosity!
For the fourth turn in a row, the entire center concentrated its fire on one chaos unit, this time it was Slim who would fall in a flurry of lasguns and other Imperial armaments. The lone assault marine finally succeeded in killing Toe Jam with his power fist and stands in triumph below.
Chaos Turn Six: Remaining Forces Secure Objectives
With everything dead, the plaguebearers were left to secure an objective each. The immobile landraider hadn't been able to see a target for several turns so it's lascannons and heavy bolters remained silent. The predator continued its ineffectual fire. And all that was left to do was count up the victory points and take the final picture.
A Draw!?
Despite having everything on my side being dead except a handful of plaguebearers and some vehicles, two of which were damaged, due to the size of the game and the extra objective I held the point differential yielded a tie. It felt like a loss. My army list performed like it was put together as a random selection of units chosen out of necessity rather than by choice. My two supposedly expensive lords, were in fact cheaper than both the Chaplain and Chapter Commander fielded by Jonathan in his 1500 points. My dreads did very little as did the Defiler. Even being hull down it died easily. To be effective it may require a really big hill to hide behind to be effective as it is just too fragile. The landraider once immobile was a non-factor, whilst the predator excelled at killing enemy armor, which was its original purpose, it did not fare as well on infantry models. Perhaps I should have drove it forward on the last two turns, but that would reduce the amount of shots it could take...Imperial Closing Thoughts
Right from my first shooting phase I new what kind of game it was going to be on our left flank: my only plasma gunner immolated himself trying to pop the Rhino containing squad AXE Gang (snake eyes for both "to hit" and saves!) and then the Leman Russ' only shot of the game drifts in the only direction that wouldn't result in hit. And it was all downhill from there! The only bright spot was that the Rough Rider squad eliminated squad AXE Gang in the second turn. The Plague Bearers were simply invincible. Not only did they not lose a single model for the entire game (three shooting phases and several assault phases) they didn't even have to make a save! I just couldn't wound them. The centre did it's job well. I used the Rough Riders too early; there was no reason to charge them into The Big Unit when I did. I should have waited for the Terminators to arrive - they excel at removing those tough to budge, low model count units from the table. On the right flank the Vindicator and, more specifically the Assault squad and Chaplain, cleaned things up nicely although the Assault Marine with the Powerfist sure took his sweet time playing with that Dreadnought.
What's Next?
Back to school to continue my MBA. I bought a ticket to Conflict Vancouver but I don't plan to spend too much time there. Rob is planning to check it out on Saturday too. Thor and Nathan are running a table and I should know a few other people there. I plan to hang out a bit and buy a few bitz, that's about it.
Although I brought paints and some models back to Vancouver with me this semester, I don't know how much painting I'll be able to do. Conflict Seattle though a nice thought might not happen. Maybe I'll go to a Conflict in the summer though when I don't have classes, but that would require flying somewhere down South or a really long drive. There is always Winnipeg...
I'm still working on my Nurgle 3.0 army. I've yet to revise it past version K. But I'm pretty much keeping it as I've intended. Syphilis will become a fourteen model squad rather than twenty. I will paint a new champion for them, though what he will be armed with is yet to be determined. I may end up using my current predator rather than build an all new one. I hope to paint my forgeworld dreadnought as well as some new HQ choices. I also plan to put up a plaguebearer painting tutorial and experiment a bit on them. After that I will touch up some of my old paint jobs and then strip the rest and repaint them as chaos undivided so I can make use of all the models armed with heavy weapons. The timeline for all this is the rest of the year, though after the summer nothing will happen if I go on exchange.
2005 Conflict Vancouver