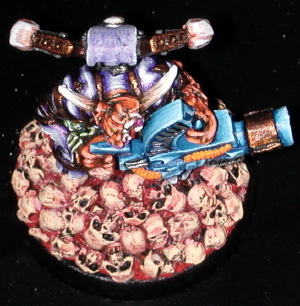
Painting a new Nurgle Chaos Lord
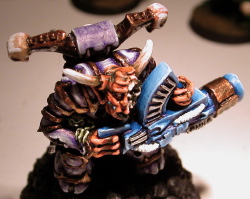
A new grand tournament army needs a new general. I wanted to do something that I'd never seen done. I'd never seen an army online or in the White Dwarf that had a Chaos Lord armed with a Kai Gun and since I wanted to make a shootier army I decided to run with it.
Arming a Chaos Lord for ranged combat goes against the fluff to a large degree and neuters the strongest H2H model in my army. I have a tendency to advance needlessly. Giving my lord a 25pt gun would force me to be more disciplined. I plan to deploy him with the twenty member Plague Marine squad.
In practice games this unit hasn't really accomplished much and has been forced to advance both to get into range and to capture mission objectives. Where this unit will really prove its worth is against armies which advance into H2H, when it gets to hold an objective, and in those missions when you can only deploy a single troop choice. Since they are not an official retinue I can also deploy my Chaos Lord independently of them even with another squad.
Painting Technique
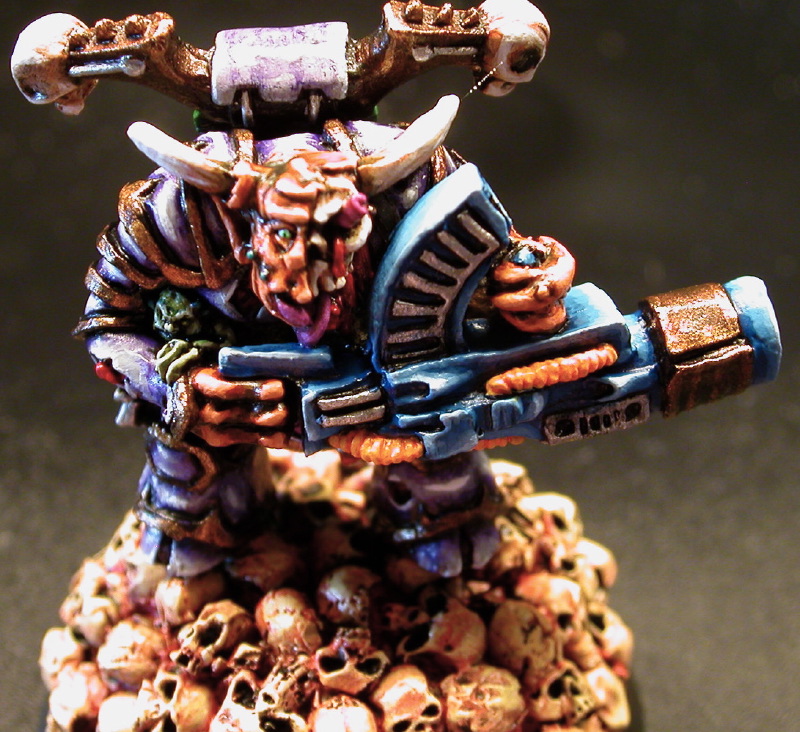
The model itself is an old Nurgle Chaos Renegade armed with a heavy weapon. The weapon I chose to use is the grenade launcher which is no longer part of the Chaos arsenal. It has a clip so I figure it would make an OK Kai Gun. The model also has Kharne's backpack and a base from Epicast. This is the same base I used on the Phantom of the Rock Opera which was converted second, but painted first.
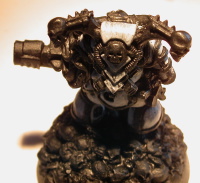
First I spray primed it black. Then I painted it black by hand ensuring a good solid undercoat. I always paint the power armor first when doing Marines. For this model I wanted the armor to be a real pale purple both because I think it is a cool color I've seen other's achieve and it would make the model stand out from the rest of my army. After talking with Owen and experimenting on several plaguebearers I came up with a plan.
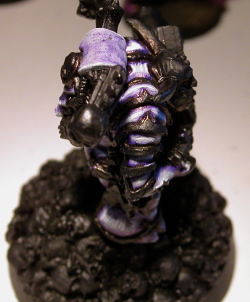
Basically I decided to paint the model grey then add the purple tinge through thinned washes. First I coated it with Codex Grey then Fortress Grey. I think I did two coats of Fortress Grey even. Then the first of several ever thinner purple washes. After each wash dried I would highlight again with Fortress Grey. Several coats later I applied some final Fortress Grey and even Skull White highlights and deemed the armor done. I didn't use my tiny line technique rather the conventional layered highlights, but I put a few striations on in the end.
After the armor I paint the trim. I've stuck with the same combination of colors for a couple years now. First I paint it Tin Bitz, then highlight with Brazen Brass then a wash of thinned Rust Brown Ink. Next I paint the tubing green. Again I use the same colors of late: Dark Angels Green, Goblin Green, and Striking Scorpion Green. I also use a thinned down green wash.
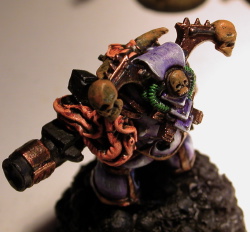
Next I decided to paint the tentacle arm, the flesh covered half of the face, and the model's un-gloved hand. I wanted an evil orange skin tone. I tried and failed to get the tone I wanted on my last GT army's general. I did a better job years ago on a lone plaguebearer. Again I'd been experimenting and I've added a few more pots of paints that I didn't use to own.
I wanted an orange that was neither red nor yellow. To achieve this I first painted over the Chaos Black with a brown, possibly two browns, maybe even three. I definitely used Snakebite Leather. After it was brown I painted a layer of Blood Red, then a layer of Vomit Brown. I also planned on using some washes but I don't think I used a red or a brown wash. To keep it orange I only used orange wash funnily enough. I also used Fiery Orange, several coats intermixed with thinned washes. I then used several flesh colors, Dwarf Flesh and Elf Flesh also with thinned orange washes. Many coats of paint went into achieving the color and highlights on the tentacle, face, and hand.
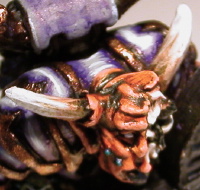
When I was painting the skin Snakebite Leather, I also painted the skulls Snakebite leather. For the skulls on this model I used Bleached Bone, I did the skulls on the base completely differently than this. After the Bleached Bone I used a thinned down Rust Brown Ink along with several coats of Bleached Bone. I used Skull White as the final highlight. On the horns I let some of the previous colors show through to achieve the striations. I also applied the washes only to the base of the horns.
Next up was the Kai Gun. I wanted it to not look Nurgle as it was made by the enslave Kai race. To accomplish this I painted it blue. I used Festering Blue gradually blending in more and more Space Wolf Grey until the final highlight was pure Space Wolf Grey. I did not use washes in between coats and painted the highlights right on top of the previous coat without allowing time for it to try.
I did use a blue wash mixed with some black ink after the first two coats of Festering Blue before I began highlighting as I wanted it to have a few lowlights. I also painted the tubing white, several coats of white, before applying any blue. I wanted it to be brightly painted in contrast. I opted for yellow. I used two coats of Fiery Yellow then an orange wash. I then highlighted the tubing with Fiery Yellow and eventually Sunburst Yellow. I also put even more orange wash into the folds of the tubing.
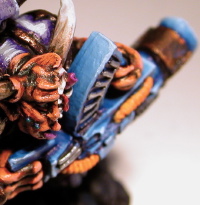
Portions of the gun were also painted metallic. Some of it was the standard Tin Bitz, Brazen Brass, and Rust Brown Ink, the other portions were painted Chainmail, Silver, and used some armor wash. I painted the metallic portions before I painted the blue or yellow parts of the Kai Gun to avoid the possibility of ink running on to the blue portions.
Before I painted the gun, I also appear to have painted the Nurgling. I used Camo Green and Rotting Flesh with some washes (black and green). I wasn't too happy with the Nurgling but it is a small portion of the model and it was hard to paint a lot of highlights or lowlights after already painting the armor and the trim. I didn't have to touch up the armor much, but I had to touch up the trim a few times while painting this Chaos Lord.
After the gun I only had to paint the exposed guts. Previously when I painted this model more of the face was exposed and I did things slightly differently. This is actually the third time I painted this Nurgle Renegade and each time I've done a better job. I decide to paint the exposed guts two ways my standard Blood Red, red and black ink, and Crimson Gore method, and a new purplish style. For the latter style I used Fire Dragon Crimson, then a wash of Plasma Red ink, then I mixed in a little Titillating Pink into Fire Dragon Crimson and painted on highlights. After that was done I used Purple Glaze. I think it came out pretty good. It isn't the same as the red guts nor is it the same as the purple in the power armor.
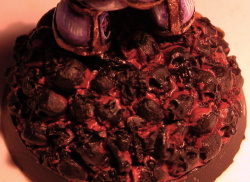
With the model finished, it was now time to paint the mound of skulls base. I wanted it to be different than the Phantom of the Rock Opera. So after giving it some though I decided I would use Vellejo Beige instead of Bleached Bone, however the first thing I did was paint Blood Red between the skulls. I then painted the skulls Snakebite Leather. I wanted more red so another coat of Blood Red was applied before the skulls were finally painted Beige.
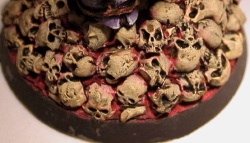
After the first coat of Beige I used a thin red wash over everything. It might have been too thin so I used more Blood Red and even Red Gore between some of the skulls. The skulls themselves received several coats of Beige and even another wash of a thinned down rust brown ink. I mixed in some Plasma Red ink too. Finally happy I declared the model done and took it downstair to await sealing.
When the light is better I'll take some final photos and include one at a higher resolution.
After a lot more painting and more time spent looking for a job unsuccessfully, I figured it was time to play another game. Especially since almost everything I wanted to field was converted and painted. It had been converted for a number of years and the basic idea for my third Nurgle Grand Tournament was formed before I even got to field my second grand tournament army in Vancouver.