Painting an army centrepiece
Every army needs a centerpiece model or two. My Vancouver GT army had several, it was tough to say if random passerbyes were more impressed with my scratchbuilt deflier, the first ever used in a Grand Tournament, or my Landraider. Dirty Steve however took a picture of my general and it is possible I spent the most time painting it especially when you consider its size.
My proposed third GT army underwent a lot of revisions to its army list. In Vancouver I just came up with a list and then built everything I needed, I never did playtest it or even play a game with the then new Chaos Codex before the tournament started. I don't recommend that. Much better is to refine your army list and have as many practice games as you can with the final force. My army list still could be revised but the major portions including the centerpiece models have been determined.
Originally I was going to build a new sponsonless Predator with Mutated Hull and have a Defiler as my two Heavy Support choices. However with the release of fourth edition and my general desire to improve my older paintjobs where possible I will probably use my original Predator armed with an Autocannon turret and Lascannon sponsons. But before I made that decision I ordered a Forgeworld dreadnought which both replaced the Defiler in the army list and provided a natural centerpiece model.
I had already converted and painted a one of a kind model to be the general of my third GT army. And my terminators which bolster my long range fire power have been converted and painted extremely well, easily well enough to be a centerpiece squad. The predator can be improved further and I plan to add more details to the bases and build a display once I've finally settled on an army list and actually registered to attend another tournament.
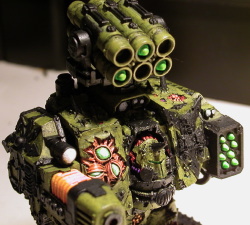
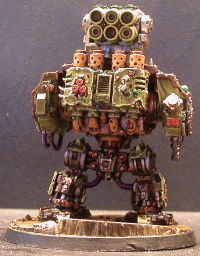
How I painted my Nurgle Forgeworld Dreadnought
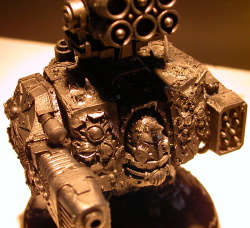
After buying, assembling, and converting the model I spray primed it black using Citadel primer. The model then sat in a box for a year or more. Even though I spray primed it, I spent a lot of time getting black paint into the little cracks and crannies. I don't know if I ever got them all. With priming this model taking so much effort, paint naturally took a long time. I always assemble then paint my models, but this was one model that probably could have benefited from painting unassembled.
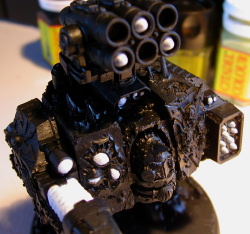
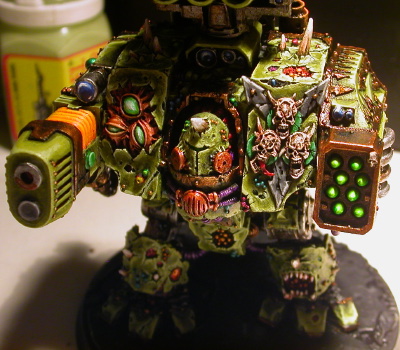
I actually did a lot of things different on this model. I wanted it to stand out from the rest of the models in the army, plus I needed some portions of the model to really pop so I put several coats of white paint on the missiles, the heavy plasma gun, and some view finders. I also painted the eyes of the model white. Almost all the white was painted Putrid Green with a thin wash of Waaargh Green Ink.
The heavy plasma gun was more work. I painted it several coats of yellow, Sunburst Yellow perhaps. I also used several orange washes. I then used Badmoon Yellow perhaps for highlights and possibly some yellow glazes.
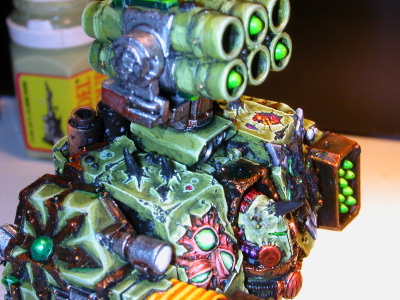
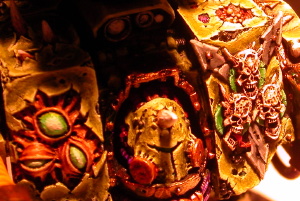
Next was the armour plating, I painted it two coats of Camo Green. Then I decided I would paint the indented parts of the dreadnought. This includes several large open wounds as well as the flesh and eyeballs on one shoulder. I also painted the cords and tubes on the dreadnoughts neck.
I used a lot of different colors. The eyeballs flesh was worked up from brown, to orange, to flesh. I used perhaps too many washes. The actual eyeballs didn't come out quite right. I used some green washes on the eyeballs which left too much of a black line look. I had carefully mixed in white to some old GW green, Jade maybe. I own a dozen or more different GW greens, I used most of them on this project.
My Camo Green color scheme which I had honed on several plaguebearers involves after the two coats of Camo Green a thin Armour Wash to dirty things up again and provide shading, then I mix Camo Green with Rotting Flesh. One thing I did differently again was I highlighted a portion of the model all the way up to pure Rotting Flesh, then worked on a different portion of the model. Perhaps my blending would end up a little off, but the model has a lot of armour to highlight and the final result doesn't reveal this little variance from the norm.
I didn't use my tiny line technique. Nor did I use pure GW edge highlighting. I did highlight the edges, I also gave the flatter portions extra detailing. This is how I came up with the tiny line technique it grew out of trying to make armour more exciting, not necessarily more realistically highlighted. This might not look good on all models but it works well for daemonic Nurgle stuff which is what I mostly paint.
It took me a day or more to do the armour. Not eight hour painting days, but separate days with different amounts of ambient light. I think I might have gone lighter at the beginning then I did on later portions of the model, but in the end things looked good. I had to do a few touchups while painting all the rest of the model, but in the end didn't have to do hardly any touchups due to careful planning and not using many washes or any drybrushing.
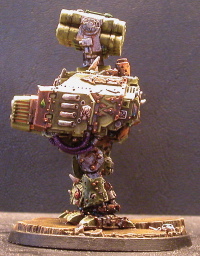
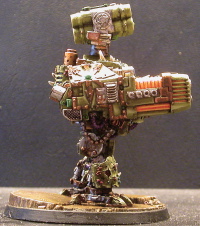
Next up were the metallic portions of the model. This includes the trim which was done my traditional Tin Bitz, Brazen Brass, and thinned Rust Brown wash. I also later used some Waargh Green Ink on the brass trim, and then I sometimes added Tin Bitz or Brazen Brass on top of that. I had left a lot of the model besides the trim to be metallic and the second color I used was new to me. I used GW's Chainmail a brand new pot, unlike all my other GW paints which are from one of the four previous bottle styles. After putting the Chainmail on a lot of the model I was really worried it was too shiny, so I dirtied it up with Tin Bitz. Then my planned armour wash. Then I use Rust Brown Ink to get the rusted effect. Then I highlighted portions with Mithrel Silver.
This still left a lot of the model unpainted. I wanted a copper color for the breathers and other breather like details. I used Brazen Brass with Dwarf Bronze highlights. I used a lot of washes, a mixture of Rust Brown and Plasma Red Ink thinned. I then highlighted the edges with Glittering Gold or some GW Gold. I actually missed one "breather" on the back of the model so I painted it my only Ral Partha paint color Metallic Bronze. I highlighted it with Glittering Gold and again used several custom washes. It doesn't look too different from the rest but perhaps it is noticeable. I may have used some Yellow Wash or Yellow Glaze on this painting effect.
I had also painted all the bolts Brazen Brass, though some were missed or needed to be painted later anyway. There were still many plates that were black. I painted some of these grey. I used two Velljo greys, Grey Green and Green Grey. I carefully blended these together and the only time I had any trouble with paint rubbing off the model was the very tip of one of the arrows on the models chest. I had to rehighlight that and blend it to match the rest of the arrows.
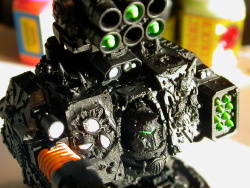
I also used two different greens on unpainted black portions. One was my traditional Dark Angle Green, Goblin Green, Scorpion Green complete with thinned Green Wash. Before that I used Jungle Green gradually blending in more and more Bilious Green or something. No it must have been Rotting Flesh or perhaps just white. This is the color you see on the green discs on the models chest plate.
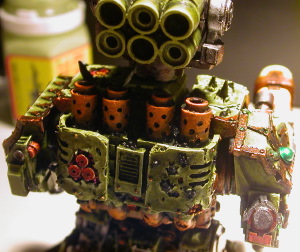
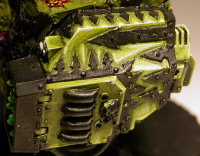
I almost forgot about the color I painted the exhaust pipes. I started with a blend of Tin Bitz, Bestial Brown, and Chaos Black. The next color was a mix of Bestial Brown and Tin Bitz. Then I started mixing in some Snakebite Leather and ultimately some Fiery Orange. I ended up adding more Fiery Orange highlights as I did this late at night and my transition was a bit too harsh from the back of the model to the front. I was happy with color I created, I'd never used Fiery Orange for rust before. I'd always used Rust Brown Ink or Tin Bitz or both.
Now I did the skulls and all the spikes protruding from the armour. I first painted them Snakebite Leather. I actually missed several skulls so I had to repeat this scheme several times. After Snakebite Leather I do Bleached Bone then a thinned Rust Brown Ink then Bleached Bone highlights and eventually Skull White. I don't really dry brush, but I don't strictly highlight the edges either.
Next was the purple tubing. I had painted two tubes previously on the model's neck but I had to do several more particularly on the guns. I used Liche Purple lightening it with Tentacle Pink then purple wash then another highlight then maybe another wash. I keep going until I'm happy. I don't want things too pink.
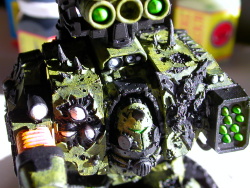
Next came the pustules, these I painted all different colors. I used brown highlight up to red or even orange or even yellow. I used lots of greens, definitely highlighting up to Bilious Green possibly even yellow. I didn't use many washes or inks or glazes on the pustules. I actually wanted a lot of them to be blue. Blue is a good accent color for Nurgle models as it is used so rarely. I used a Sickening Blue to Space Wolf Grey highlight scheme. I used Nauseating Blue up to Moody Blue. I also used Swooping Hawk Turquoise highlighting it up with a green perhaps Bilious. Some of them also use Fire Dragon Crimson as a base working up to red.
I also painted the scopes or sensors around this time. They are also blue, I think Moody Blue gradually blending in more and more white. I eventually used pure white to do the dots. This is one of the rare places I highlight up to white or even blend in white as part of the highlighting process.

I painted the center of the eight sided Chaos star with GW's Metallic Green. I used Waaargh Green Ink and Mithrel Silver to highlight it. After the entire model was finished I painted the base. I didn't do anything special. I used Bestial Brown, Snakebite Leather, and Vomit Brown on the dirt along with some Brown Wash, even some Black Ink. I painted the shell casings Brazen Brass with Rust Brown Ink. The skull was painted the same way the skulls on the dreadnought itself were painted.

I wasn't in a real hurry to finish this model, but I wanted it done before Christmas when family was coming over. I wanted my paints put away and all my models safely stored, we are having a really large Christmas dinner, two actually. Plus we suffered a lot of power outages in November and December. When I was finally satisfied I sealed it with GW Matte Sealant.
As has become the tradition, a higher resolution picture of the finished model is available for the truely curious. Here are links to small shots of the the left, right, and rear of the model. I've also entered this model into the monthly Masterworks Miniature Painting competition. I don't expect to win, I never even remember to vote, but I think this is the third consecutive month I've entered. This is the largest model I've entered, maybe that will count for something. I'll also have to put a photo on CoolMiniOrNot to see what the riff raff thinks. The haters over at Deathguard.org forums will just have to find it in Google.
I eventually got to field Blastmarker Billy in a game, he didn't go crazy and die on the first turn but he didn't dominate. He did kill some guardsmen and managed to get mentioned by someone else on an online forum. That is pretty good for piece of painted foam. Read about my second consecutive loss to Rob.