Plague Marine Painting Advice
This is how I painted my Nurgle marines back in 2002, I've continued to refine my techniques over the years, check out my miniature painting blog to see my latest work. I paint them green, purple, and brown mostly. I also work in a variety of hideous skin colors and red toned guts and organs. I usually paint my man sized models in groups of four. I've tried a variety of numbers and for me this is the best batch size.
I'm a slow painter. I'm not the most efficient but I get good results. I use perhaps more coats of paint then necessary. Often applying another coat doesn't add enough to justify the time it took. I generally put at least 3 coats of paint on anything except the tiniest brass bolts.
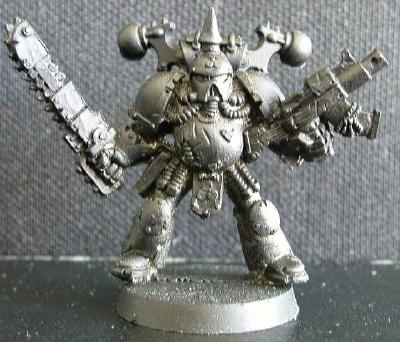
Before even applying one coat of paint it is important to assemble and clean your model. A lot of paint jobs are ruined before you even start worrying which color to paint the model's eyes due to leaving on excessive casting lines. The model I'm using for the tutorial is out of print and slightly miscast but it has some nice details and is considered one of the classic Death Guard figures.
Although I held out for a long time, I too switched to spray black primer. I still use smelly primer for some light colored models. Grey base coats were the rage for a while among the world's top painters, they can also work very well when painting Plague Marines. I spray several light coats then I go over and touch up the model with chaos black to ensure a good starting point for my paint job. This picture is from after the spray painting but before I touched up the base coat.
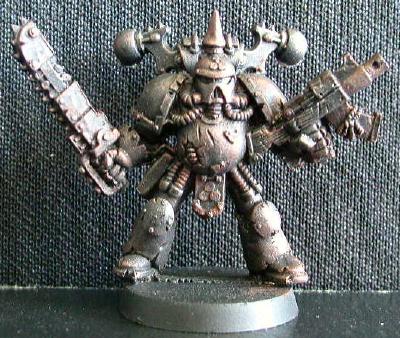
My next step I lifted from Gorka Morka. I drybrush the entire model first with Bolt Gun Metal then with Tin Bitz. This model is really rusty. Much more so than I usually go. This gets the dry brushing of metal out of the way when any little mistakes won't be noticed. It also brings out the detail in the model. You just paint over the rust so what pokes through is a rusted metal this also allows for some nice effects when painting the rest of the armor.
Well the second travesty of this paint job has occurred. First I busted off the backpack and had to chip a new hole in my super glue to fix it. Then my original (but second pot) of ork flesh has basically become almost completely solid. I'd recently thrown away some of my beloved old paints so I set about to save this pot. I slowly added water and stirred with the end of a brush. It's still far from perfect and I wasted some paint but I got another coat out of the pot.
I paint out of the paint pot lid much of the time, but I will also use a wet or dry palette too. I despise the bullet paint pots. I still use mostly round pots. I never even bought too many of the octagon pots. Anyway what is really important is a good consistency of the paint. I don't thin my paint per se, but I do lick the brush tip and thin it as needed on an old blister pack. I believe the paint coats get less important as you go forward so a good base coat of dark green is a must. Even I miss spots so you have to adapt as you go.
Even though I'm not sure what I'm going to do with the fig, I decided on painting him green. And then when it came to the next coat I decided to try the tiny line style. I almost always go to Goblin Green after Ork Flesh. This is the traditional Ork painting style I learned back in the Rogue Trader days and I still use it. I don't think anyone was painting with lots of tiny lines back then though.
I'm still experimenting with this style. It's important to keep the lines going the same direction for the most part. I have traditionally not known what to do with the shoulder pads. So the tiny lines gives me no choice but to paint them that way which is nice as I'm usually unsatisfied with my shoulder pads. For really small parts of the model, you can't really paint the tiny lines. You also have to provide highlights, the tiny lines have to be positioned with this in mind. I never touch up the tiny lines for the most part you just have to be careful, but if you do make mistakes in subsequent coats you have to compensate for it. Nurgle paint schemes lend themselves to being slightly sloppy. Of course most people who paint don't spend the time I do so what I consider sloppy...
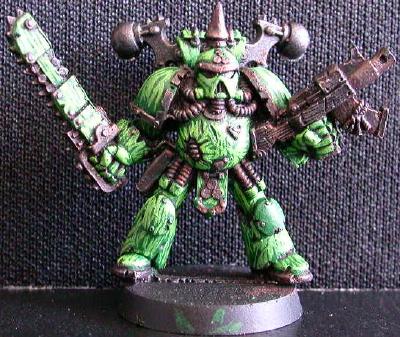
I usually don't paint one knee pad green, it will have the squad markings eventually. I also don't usually highlight the shoulder pads much because they get insignia too. This model has great weapons though slightly miscast.
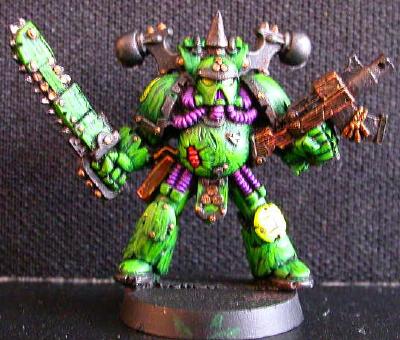
Well after a break, I finished the armor. It's officially too hot to paint anymore in Vancouver. The first thing I did was a green wash. I used Ork Flesh Wash pretty much undiluted. One trick I learned was to lie the model on it's back while the ink dries. After that I put on some Striking Scorpion Green. The first coat was from the original Ork vs Eldar paint set. It didn't add much to the model not enough contrast. So I did a coat of octagon pot Striking Scorpion green which is substantially different. It is much more yellow. Although not how I've always done it, despite the excessive yellowness I think I got a decent Nurgle armor look, which could have been accomplished in 5 coats.
I wasn't too happy with the face or the sword. The miscasting really shows upon closer examination. Lately I've been going for a paler green look, using Rotten Flesh as a final highlight. But a lot of Nurgle armies have the slimy yellow-green look of this model.
The next step for me is painting the tubing. I don't think I did my best on this. I always use Worm Purple first. I paint with the tubing rings when I can. I then use an old Fire Dragon Crimson with pink over that. Over the pink I use a purple wash. I thin the wash but its not always necessary, nor do I want the same amount of wash on all parts of the model.
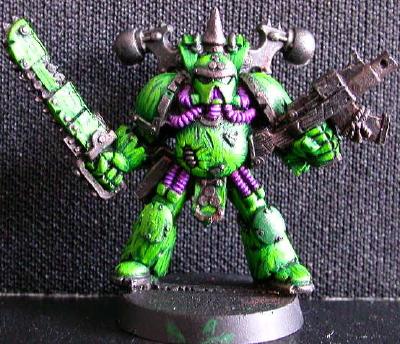
In between World Cup Games (on tape delay) I painted the gun, the holster, the guts and many of the other smaller parts of the models. I recently retired my Beastial Brown. So I'm using some new bullet pot dark brown, which affected the final result. I don't think I did a very good job on the browns. The reds are Blood Red and Red Gore, both old school with a red glaze. To make the browns different I used Brown Wash on the gun, but Chestnut Brown Ink on the other browns.
For insignia, I follow the classic black then white, then the color I want the insignia to be painting technique. I stopped after putting on the white to take a picture. Often I retouch the edges with black or don't use a black base coat at all. I also touched up the rusted parts and the green armor where needed with Chaos Black, Tin Bitz, and new school Striking Scorpion Green.

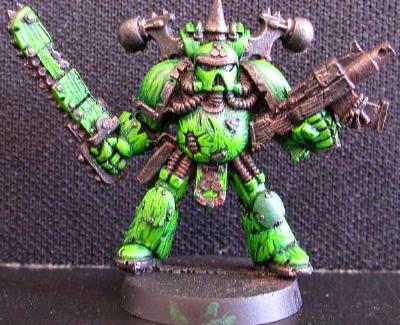
I finished the insignia with Bilious Green, which is a very old paint pot. I used brass and Boltgun Metal to detail the studs, the sword, and the flies. I painted the skull on the backpack plus the eyes and thats it.
Only the armor took any real time. It could be sped up by using less coats of paint and a simpler highlight scheme. Hopefully the final effect is worth the effort. Though it was very hot the first day I was painting I managed to push on and finish the model so I could get this webpage finished. I listened to Sly & the Family Stone "Stand!". The Doors "Strange Days", and Junkhouse "Fuzz" while painting this model. I also listened to an old Edwin Starr compilation on vinyl to chill out. The accompanying music is very important when painting in my opinion.
The model is unbased, I'll probably base him when I finish the rest of the squad. I think he should perhaps have been put into squad three oh well, I can always fix that. I also seal my models with Armoury matte spray sealer. But I haven't done that either, I need to find a source for sealer as I keep searching the web unsuccessfully, maybe they don't make it anymore.